 Save
Save My nephew called me two weeks before his graduation with a specific request: cookies that matched his school colors, something he could hand out to friends at the party. I found myself standing in the baking aisle at midnight, surrounded by bags of colored candies, suddenly remembering why I loved baking for milestone moments. These cookie bars came together almost by accident that night, but they've become my go-to celebration dessert ever since. There's something about customizing them with someone's colors that turns a simple treat into a memory they'll actually keep.
I'll never forget pulling these out of the oven during my niece's graduation week and watching her friends devour them like they'd never seen chocolate before. One girl asked for the recipe immediately, and my niece announced, loud enough for everyone to hear, that her aunt was a secret weapon. Standing in that kitchen, surrounded by their laughter and the warm smell of melted chocolate, I realized these bars represented something bigger than dessert—they were edible proof that someone cared enough to celebrate their moment.
Ingredients
- All-purpose flour (2 1/4 cups): The foundation of chewiness; don't sift it or you'll end up with tough, dense bars that nobody wants.
- Baking soda (1 tsp): Works with the brown sugar to create that perfect tender crumb, so don't skip it or substitute.
- Salt (1/2 tsp): A tiny amount that somehow makes the chocolate taste deeper and richer.
- Unsalted butter, melted (1 cup): Melting it beforehand means the dough comes together faster and the bars bake more evenly; let it cool for just a minute so it doesn't scramble your eggs.
- Packed light brown sugar (1 cup): The molasses in this is what gives you that chewy texture; don't use dark brown or they'll be too dense.
- Granulated sugar (1/2 cup): Balances the brown sugar's depth and keeps the bars from being one-note sweet.
- Large eggs (2): Room temperature if you have time, but honestly, they work fine straight from the fridge too.
- Pure vanilla extract (2 tsp): Use the real stuff; imitation won't give you that subtle warmth that makes people ask what the secret ingredient is.
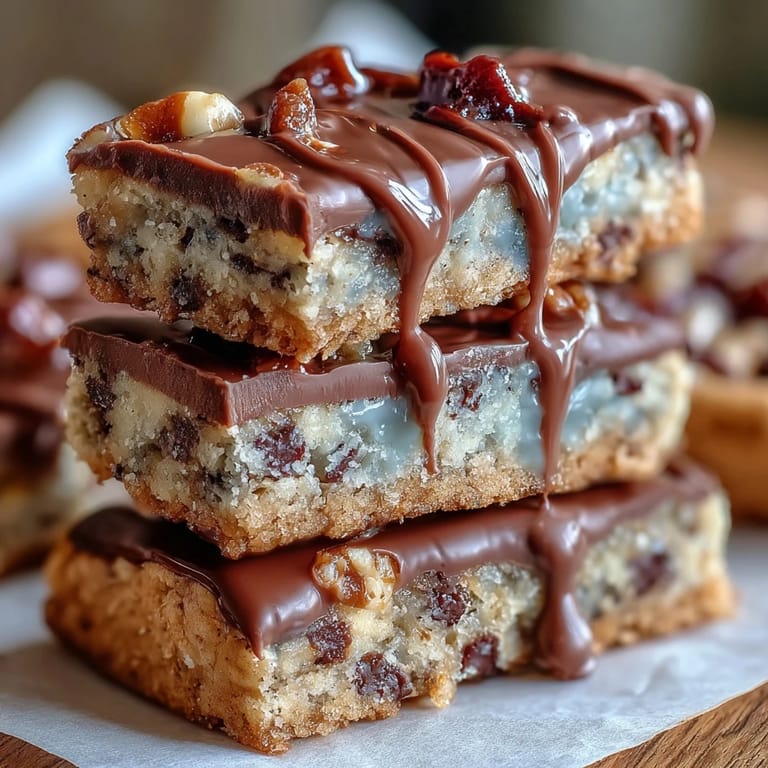
- Semi-sweet chocolate chips (1 cup): These provide the classic chocolate moment; I prefer chips over chunks because they distribute more evenly.
- Colored candy-coated chocolates (1/2 cup): This is where the magic happens; pick whatever colors make your heart happy or match your celebration.
- White chocolate, chopped (4 oz): The finishing touch that elevates everything; use decent quality or the drizzle tastes waxy.
- Vegetable oil (1 tsp): Thinning the white chocolate just slightly makes it drizzle-able without burning it.
Tired of Takeout? 🥡
Get 10 meals you can make faster than delivery arrives. Seriously.
One email. No spam. Unsubscribe anytime.
Instructions
- Set up your stage:
- Preheat your oven to 350°F and line a 9x13-inch pan with parchment paper, letting it hang over the edges like a safety net. This overhang is the secret to lifting your cooled bars out without mangling them.
- Combine the dry team:
- Whisk together flour, baking soda, and salt in a medium bowl and set aside. This step prevents weird lumps of baking soda that can taste bitter if they don't get evenly distributed.
- Build your wet base:
- In a large bowl, whisk the cooled melted butter with both sugars until it's smooth and almost silky. Add your eggs and vanilla and mix until you can't see any streaks of egg white anymore.
- Fold in the flour gently:
- Add the dry ingredients to the wet mixture and fold just until you don't see flour anymore; stop as soon as it comes together because overmixing is the enemy of chewiness. This is the moment where patience actually matters.
- Scatter in your stars:
- Stir in the chocolate chips and colored candies, making sure they're distributed so every bar gets a little of each. If you're feeling it, reserve a few candies to press into the top before baking for a prettier finish.
- Spread and smooth:
- Pour the dough into your prepared pan and use a spatula to spread it into an even layer. Don't stress about perfection; it will spread a bit as it bakes anyway.
- Bake until barely set:
- Bake for 23 to 25 minutes, watching until the edges are just turning golden but the center still looks slightly underbaked. The bars will continue to set as they cool, and you want them chewy, not cakey.
- Cool completely:
- Leave them in the pan on a wire rack until they're fully cool; cutting warm bars is how you end up with a crumbly mess. This takes patience but it's non-negotiable.
- Prepare your white chocolate magic:
- Chop your white chocolate and microwave it in 20-second bursts, stirring between each one until it's melted and smooth. Add that teaspoon of vegetable oil and stir until it's the consistency of thick cream.
- Drizzle with confidence:
- Use a spoon or piping bag to create those signature drizzles across the top of the bars. If you want them to look fancy, add sprinkles while the chocolate is still wet so they stick.
- Let it set and cut:
- Give the white chocolate about 15 minutes to firm up, then use the parchment overhang to lift the entire bar from the pan. Cut into 16 squares using a sharp knife, wiping between cuts if the chocolate is sticking.
 Save
Save What struck me most about making these bars for my nephew wasn't the baking itself but the moment after he handed them out at his graduation party. Someone asked if they were store-bought, and he looked genuinely offended, immediately explaining that his aunt made them from scratch and even picked his school colors. In that tiny moment, I saw how a simple bar cookie had somehow become proof of celebration, of caring enough to show up with something homemade.
Customizing Your Colors
The beauty of these bars is how they transform based on who's eating them. I've made versions for graduation parties, corporate events, even a surprise birthday where the person's favorite sports team colors took the spotlight. Visit any candy aisle and you'll find options beyond the basic M&Ms—there are rainbow sprinkles, pearl candies, even sugar pearls that add a different texture entirely. The chocolate chip base is so neutral that whatever colors you choose will feel intentional and celebratory, not confused.
Storage and Gifting
These bars stay fresh at room temperature for up to four days in an airtight container, which is perfect for making them a day or two ahead when you're juggling party prep. I've also packaged them in clear bags tied with ribbon in school colors—they look professional enough to give as gifts but taste like they came from someone's heart. If you're making them for a larger event, you can double the recipe and use a full sheet pan, then cut them into smaller squares so they go further.
Variations That Work
While the recipe is already pretty perfect, I've experimented with swaps that all turned out beautifully. Milk chocolate chips instead of semi-sweet give a sweeter, creamier bar, while dark chocolate creates something with more depth for people who aren't into super-sweet desserts. You can also substitute the colored candies with crushed pretzels, toffee bits, or even freeze-dried berries if you're feeling adventurous. The drizzle itself is flexible too—dark chocolate works if someone prefers it, or you could skip it entirely and dust the warm bars with powdered sugar for a completely different vibe.
- Try adding a pinch of cinnamon to the dry mixture if you want a spiced-cookie version.
- Make a chocolate-only version by doubling the chocolate chips and skipping the candies for a more traditional look.
- Sprinkle crushed candy canes on top of the white chocolate drizzle in December for a holiday twist.
 Save
Save These bars exist in my kitchen now for every reason worth celebrating, and I hope they find their way into yours too. They're proof that the simplest recipes, made with a little intention, become the ones people actually remember.
Recipe FAQ
- → What ingredients create the chewy texture?
The combination of melted butter and sugars helps create a moist, chewy texture in the cookie bars.
- → How is the white chocolate drizzle best applied?
Melting white chocolate with a bit of vegetable oil makes it smooth enough to drizzle over the cooled bars evenly.
- → Can the candy colors be customized?
Yes, color-coated chocolates and sprinkles can be adjusted to match any theme or color preference.
- → What baking pan size is recommended?
A 9x13 inch baking pan is ideal to ensure even baking and the right thickness for these bars.
- → How should leftover bars be stored?
Store in an airtight container at room temperature for up to four days to maintain freshness.